
BELLOWS FALLS — The addition of fresh herbs to a basic pastry dough makes a remarkable transformation. You will think twice about making a plain pie shell in the future!
In all the cooking classes I've held, the one technique that sparked absolute fear in many was the idea of making pastry dough from scratch. It is also one of those things that, once mastered, is fulfilling.
I'm not going to say it is always easy, but if you follow the basic rules, you will succeed.
But always remember, we can be in a mood, or the humidity might be heavy, or the flour old. Perhaps the gremlins had their way with all your ingredients the night before. Once in a while, the dough will crack, or be too soft, or difficult in some other way.
The good news is that dough can be patched and glued in place with a touch of water; it can be fiddled with a bit before it gets tough (if you don't overwork it at the beginning), and once it is filled, most mistakes disappear. It will still taste good!
Read the label on pre-made crusts. They are filled with preservatives and additives - lard, too, so if you are feeding a vegetarian, this is good to know. You have control of your ingredients when you make your own, and it will taste better.
Additionally, in the food processor, making pastry is pretty fast, probably quicker than sending someone to the store to buy a package of ready-made!
* * *
One of the best reasons to make your own dough is that you can add stuff to it and make it taste even better! I love using cheddar cheese in my pastry dough, and my new passion is adding herbs and spices to the mix.
If you want a little extra interest for your apple pie, add some cinnamon or allspice directly to the flour mixture of your crust. A savory pie? Basil, rosemary, tarragon - all work well in a crust. Experiment with what you like.
If you want to make this dough plain, omit the zest and the rosemary. You will still use the lemon juice or vinegar because the acid helps to cut down on gluten formation, which helps to keep the dough tender. You can also substitute vodka. You will taste none of these ingredients.
Of course, if you have your own favorite pastry recipe, simply add the herbs and zest.
The holidays are coming, fear not! I've used the rosemary pastry dough here in both a sweet and a savory application. It adds a lovely background flavor to a tomato tart, and it really jazzes up a pumpkin pie. Everyone loved this addition, and the gremlins stayed away.
Rosemary and Lemon Pastry Crust
In a food processor fitted with a steel blade, add:
¶3 cups flour
¶1 tsp. salt
¶Zest of two lemons
¶1 heaping Tbsp. rosemary, minced
Pulse so that everything is combined. To this add:
¶1{1/2} sticks butter, cubed, chilled
¶{1/3} cup shortening, chilled
Pulse quickly six or seven times. The dough will look like coarse sand with some big clumps of butter in it.
Drizzle over the dough:
¶1 Tbsp. lemon juice
¶{2/3} cup ice water (hold a little back)
Pulse again, quickly, six or seven times. Open the top and take out a little clump and squeeze it. If it sticks together easily, your dough is ready, even if it still looks unmixed. If it falls apart, add the rest of the water and pulse once or twice. The dough will still look craggy and unmixed.
Pour the whole thing out on a lightly floured counter and very gently press the dough together, bringing up the loose sides.
You can also place the dough onto a large sheet of plastic wrap, gather up the sides, and press the edges into the dough until it forms a mass.
Gently press it into a large disc, wrap it up, and place it in the refrigerator for 30 minutes. This is an important step. The gluten in the flour needs to relax, the flour needs to absorb the water, and the dough needs to get chilled again.
Chill for at least half an hour. If the dough becomes rock hard, take it out a few minutes before you plan to roll out.
This recipe makes two crusts, so once it is chilled, cut it in half. I just guess, but you can use a scale if you want to be precise.
Lightly flour the board, and roll out each dough ball gently from the middle, turning it a quarter turn every couple of strokes. Do not roll all the way over the outside edge, or you will end up with really thin edges. If it sticks to the board, run a long strip of dental floss under it to loosen it.
If you don't have a food processor, you can use a pastry blender to combine the ingredients; it will turn out just as good!
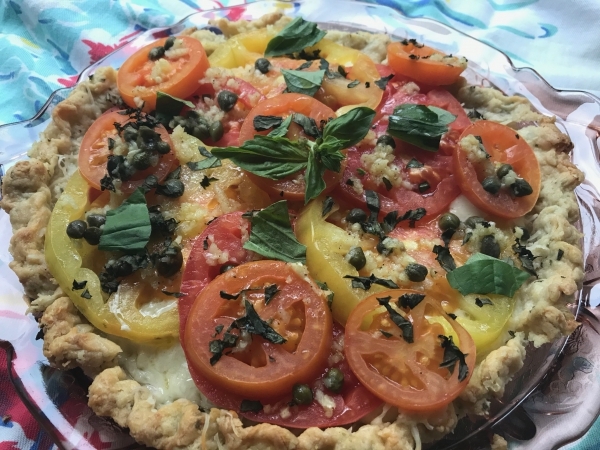
Tomato Pie
The surplus of cherry tomatoes has finally dwindled at our home to the last few treasures ripening inside. Last week, we had a 65-degree day, and I fully expected to look at my sad little plants and see new fruit, but no such luck.
But armed with some lovely heirlooms from the farm stand, I decided that during this lovely little respite of warmth, I would need the flavor of summer. That would mean tomatoes and basil, with a little fresh mozzarella thrown in for good measure.
So, tomato pie it was –– a baked, one-crust pastry shell, filled with cheese and tomatoes and warmed though until the cheese melted and the tomatoes softened. Simple, delicious, and always a hit.
This is one of our favorite recipes, served at room temperature, or even cold. It can take its place as an appetizer, a starter, a lunchbox or picnic treat, or a main course with a little salad. It is also really simple.
The addition of the rosemary crust was a hit!
If you have a pre-made pastry sheet on hand, this is a really quick dish to make. If you are entertaining, this is one of the best dishes to make a day ahead for a stress-free party.
Choose tomatoes that are ripe but still firm. Use your favorites. I think a mix of varieties with different flavors is nice in this dish.
Pre-bake (see “Blind-baking the crust”) and then set aside:
¶1 crust rosemary pie shell or other shell
While crust is cooling, slice:
¶3 large tomatoes and a few cherry tomatoes, if you have them
Place the slices on a clean kitchen towel or paper towels and let them drain. This step is essential; otherwise, your pie will be watery.
Once the pie crust is baked and the tomatoes drained, it's all about assembly.
Spread out in the bottom of the pie shell:
¶1 ball fresh local mozzarella cheese, sliced
Arrange the tomato slices over the cheese, and top with:
¶2 Tbsp. extra-virgin olive oil
¶1 Tbsp. capers
¶2 cloves crushed garlic
¶A few basil leaves, torn
¶Salt and pepper
Return the pie to the oven and bake for 20 minutes or so, until the tomatoes look nicely softened and the cheese is melted.
Let cool, and sprinkle with:
¶Fresh basil, torn
¶Freshly grated Parmesan cheese, optional
Let cool to room temperature before you cut it.
Imposter Pumpkin Pie
I have rarely made a pumpkin pie from scratch, and when I have, it has not turned out as good as my mother's. Couple that with the fact I'm not a pumpkin-pie lover, and there has been little experimentation in my house.
When I was going through my mother's recipes, I found squash pie, which I remember she often made, and it tasted just like pumpkin pie. The pumpkin pie recipe? It was a recipe that used canned pumpkin! Her squash recipe used fresh butternut.
Hmm. What did she know that it took me years to figure out?
I looked up pumpkin pie recipes from some of the cookbooks from the 1930s and '40s, and they often listed “Pumpkin or Squash Pie.” Obviously, the ingredients were used interchangeably, but it was odd that my mom made her pumpkin pie with canned pumpkin but her squash pie from fresh squash.
Floating out there on the internet are a number of pages that explore whether canned pumpkin is actually other squash - not that it matters. These pages point out that the canned pumpkin (or other squash) is not made from the jack-o-lantern “pie pumpkins” that we see for sale this time of year.
I decided to make a scratch “pumpkin” pie using squash, then see what my family and friends thought.
Of course, I couldn't just leave it at that; I added a few things not in my mom's recipe: black pepper, cayenne, a little crystalized ginger to top it off. The rosemary lemon pastry crust was wonderful.
The result? The people who love pumpkin pie,oved the traditional canned pumpkin pie better. The folks, including me, who don't preferred the squash pie.
Plan accordingly for your holiday gathering.
* * *
Preheat the oven to 450 degrees.
On a rimmed baking sheet place:
¶1 medium butternut squash, cut in half lengthwise
Bake for 40 minutes, or until the squash is soft.
Scoop out the flesh, purée in a food processor or blender, and reserve 2 cups for this recipe. The rest can be frozen.
Reduce the oven temperature to 350.
In a small bowl, combine:
¶{1/2} cup white sugar
¶{1/4} cup brown sugar
¶1 tsp. cinnamon
¶{1/2} tsp. ginger
¶{1/4} tsp. cloves
¶{1/2} tsp. salt
¶{1/8} tsp. cayenne pepper
¶{1/4} tsp. black pepper
In a large bowl, beat:
¶2 eggs
¶1 can evaporated milk
¶2 cups of squash purée
¶2 tsp. vanilla extract
Add the sugar mixture, and mix well.
Pour into pie plate lined with:
¶1 rosemary lemon pie shell, or other pie shell
Place on a baking dish, and bake for 50 to 60 minutes, or until the pie is set, except for a little jiggle in the center.
Cool for at least 4 hours, or overnight.
Top with:
¶1 Tbsp. candied ginger, chopped
¶Lemon zest